
Working with normalised SQL Tables – a guide
Wed, 31st Oct 2018
Disclaimer: This blog post is technical. It speaks to normalisation of SQL data and will not be appropriate for non-developers. Second, the goal of this blog post is to explain a method for working with normalised SQL data in PowerApps. The SQL tables, views, and app I created for this blog post are educational in nature and are therefore contrived. This article assumes the reader to be proficient in PowerApps development.
Microsoft PowerApps allows connections with many different systems. Some of those are naturally going to be SQL databases. With PowerApps, connecting to a database is a cinch. Simply establish a connection to a cloud-based database within your Tenant by creating a new SQL Server connection. Enter the SQL server name, database name, then give credentials for an account on the server with the permissions you desire (read vs write). No coding is necessary.
While this works well, in any enterprise environment SQL data is going to be normalised. This means that the tables themselves are going to be full of relational ID numbers.
Realising this, Microsoft has done a good job of allowing the SQL connector in PowerApps to read views within the database.
But, that's all you can do with views. You cannot Update or Add a record to a view in PowerApps. Further, PowerApps does not leverage stored procedures (as of the date of publishing) to assist with adding or updating records. This creates real challenges when trying to add or update records in a normalised SQL database.
If your app only needs to read data, create a view that resolves the relationships and you are ready to go. But what should you do if you want to add or update records?
You can display a view, but you cannot update the view or add to it. How should you proceed? Your users will need to see item names, but the table is going to expect ID values.
Based on my experience the following are steps you can take to ensure a good user experience when working with normalised SQL data:
For the purposes of this post, let's assume we want to create a Power App that allows employees to inventory items at our worksites. The inventory is tracked in a SQL database and the Power App needs to integrate with that database directly.
First, I recommend setting up views in the database that contain both the name fields as well as the ID fields. This is what the SQL tables might look like. For Worksites, Items, and Current Inventory.
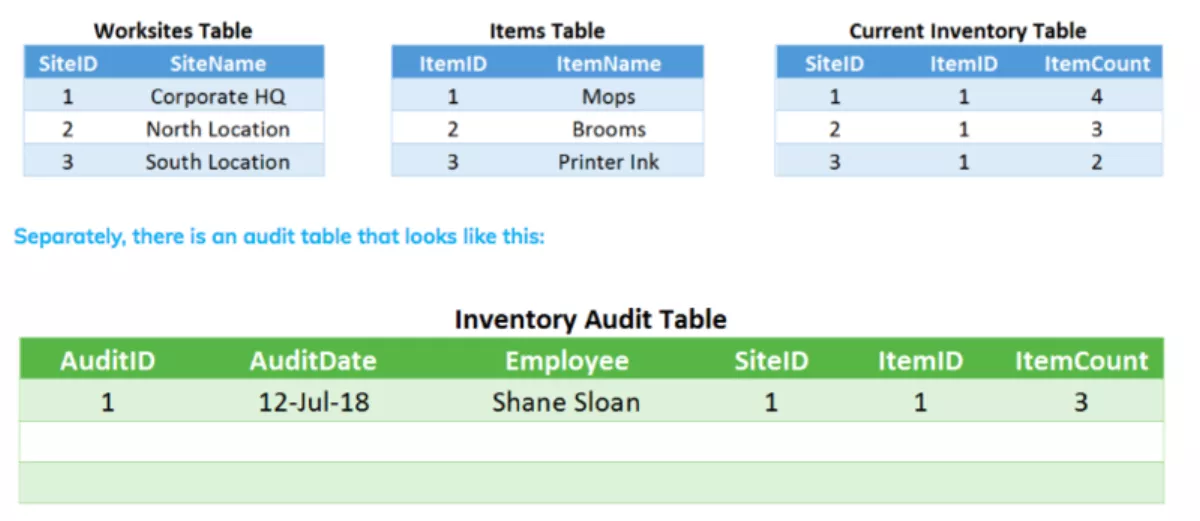
The employee responsible for counting inventory is not likely to know that the ID for "Mops" is 1 or that the ID for "South Location" is 3.
The employee is going to need to see the names of these items and worksites. Again, this can be solved with a view. However, when the employee wants to update the Inventory Audit Table, the view cannot be used and the original ID numbers will have to be entered.
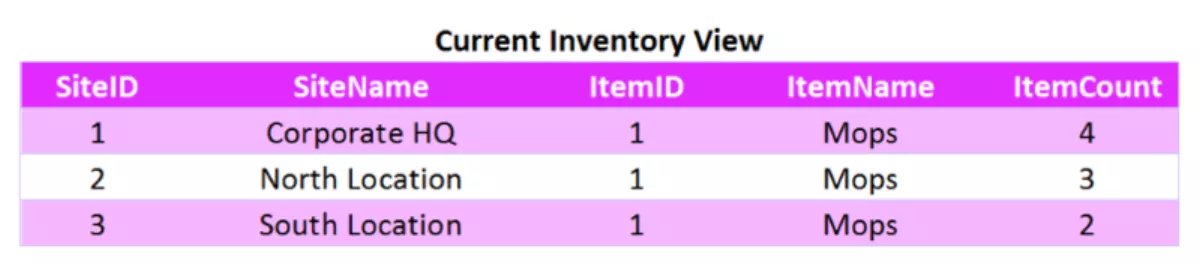
Let's look at how the view should be setup. Below I've created a Current Inventory View that contains the names as well as the ID fields.
This view will allow us to show the employee the name of the worksite or item, while still retaining its ID. The Current Inventory view is based on the Current Inventory table and uses JOINs to add in the names for the worksites and items.
Armed with this Current Inventory view, you can now setup a Power App that displays the Current Inventory and facilitate entry into the Inventory Audit Table.
Let's walk through an app that could use this data and how it would need to be setup. Here is my user interface. I am displaying names to the user but will be able to resolve the appropriate IDs later thanks to my view.
Ignoring that fact that this may not be the best user interface design, lets skip to how I'm able to make use of the view.
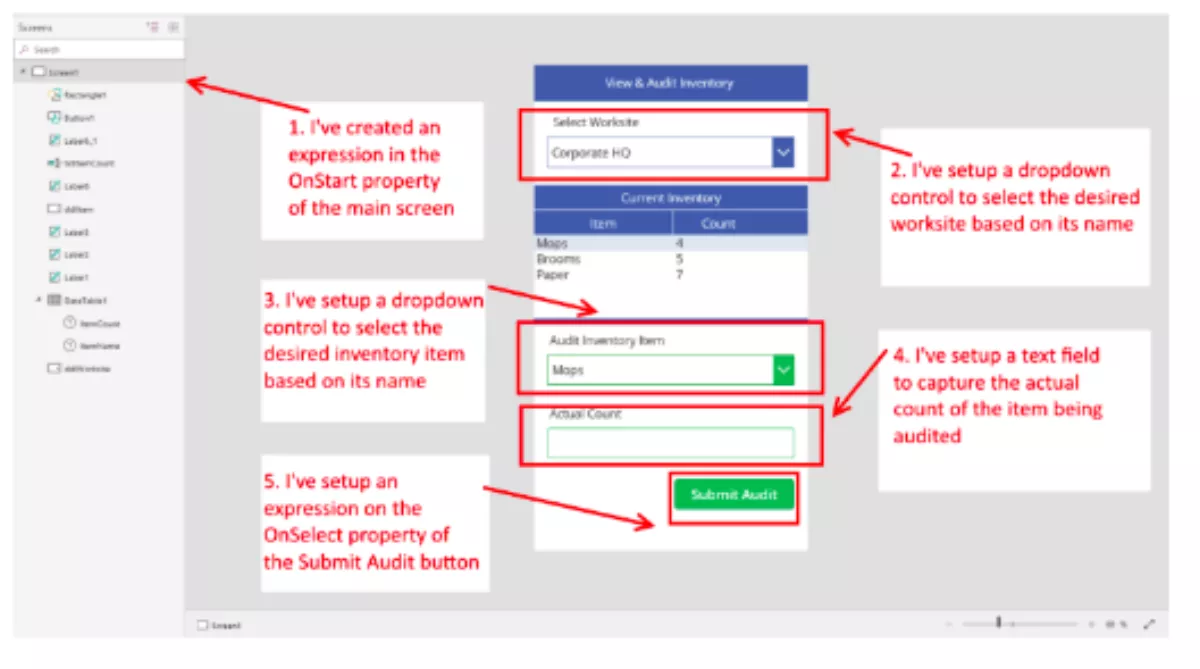
Here are the five key points:
- On Screen1 I have set an expression in the OnStart. For performance reasons I am creating a collection which I will name, "colCurrentInventory". This collection will contain the entirety of the Current Inventory view that I described above. Doing this minimises the amount of times that the app needs to query the SQL database. If I worked directly with the view instead of creating a collection, then each subsequent step would incur a delay as the database is queried again and again. You should always work with collections to minimise SQL queries and optimise performance.
Here is the expression: Collect(colCurrentInventory, '[dbo].[View_CurrentInventory]')
- I have created a dropdown control, named it ddlWorksite, and set an expression in its Items I am using the collection from step 1 and then using Distinct() to remove duplicates so that the drop down contains each worksite name only once.
Here is the expression: Distinct(colCurrentInventory, SiteName)
- I have created a second dropdown control, named it ddlItem, and set an expression in its Items For this drop down we need to have a list that is based on the selection in ddlWorksite. For that, I am going to use the collection again and this time I'm going to use Filter() to ensure only inventory items at the selected worksite are displayed.
Here is the expression: Filter(colCurrentInventory, SiteName = ddlWorksite.Selected.Value).ItemName
- I have created a text field, named txtItemCount, to hold the actual count observed during the audit. I set the Format property to Number. This isn't strictly necessary, but its good design and takes a trivial amount of time to setup.
- I created a submit button and set an expression in its OnSelect This is where it all comes together. Because I'm not using a form, when the button is pressed I am calling Collect() on the Inventory Audit table. I am then passing it all fields except for the table's primary key (AuditID) as this is set in the database and auto increments. Note that to use Collect() on a table, the table MUST have a primary key defined.
Here is the expression: Collect('[dbo].[InventoryAudit]', { AuditDate: Now(), Employee: User().FullName, SiteID: First(Filter(colCurrentInventory, SiteName=ddlWorksite.Selected.Value)).SiteID, ItemID: First(Filter(colCurrentInventory, ItemName=ddlItem.Selected.Value)).ItemID, ItemCount: Value(txtItemCount.Text) } )
Digging into point 5 a bit more, there are two fields where I am resolving the ID based on the selected name in the appropriate drop down. For SiteID, I use the collection and filter it based on the value in ddlWorksite.
For ItemID, I do the same but use ddlItem instead. With both I need to use First() to obtain the correct data type – a variable (not a collection). Even though in this case Filter()is going to return one row for both of these dropdowns, there is no rule explicitly that says Filter() has to reduce a collection strictly to one row. So, I need that extra wrapper to ensure the data types match.
As a final note, I am wrapping the value in txtItemCount with Value() because the ItemCount field of the Audit Inventory table itself is 'int'. Without Value()you will get an error.
OK so that's it.
TLDR: When working with normalised data, create a view that contains both the IDs and the names of relevant fields. Use the view to display names to users while retaining the ability to resolve field IDs. When updating or adding records, resolve the correct IDs using the view and the names selected by the user.